Showing posts with label meat. Show all posts

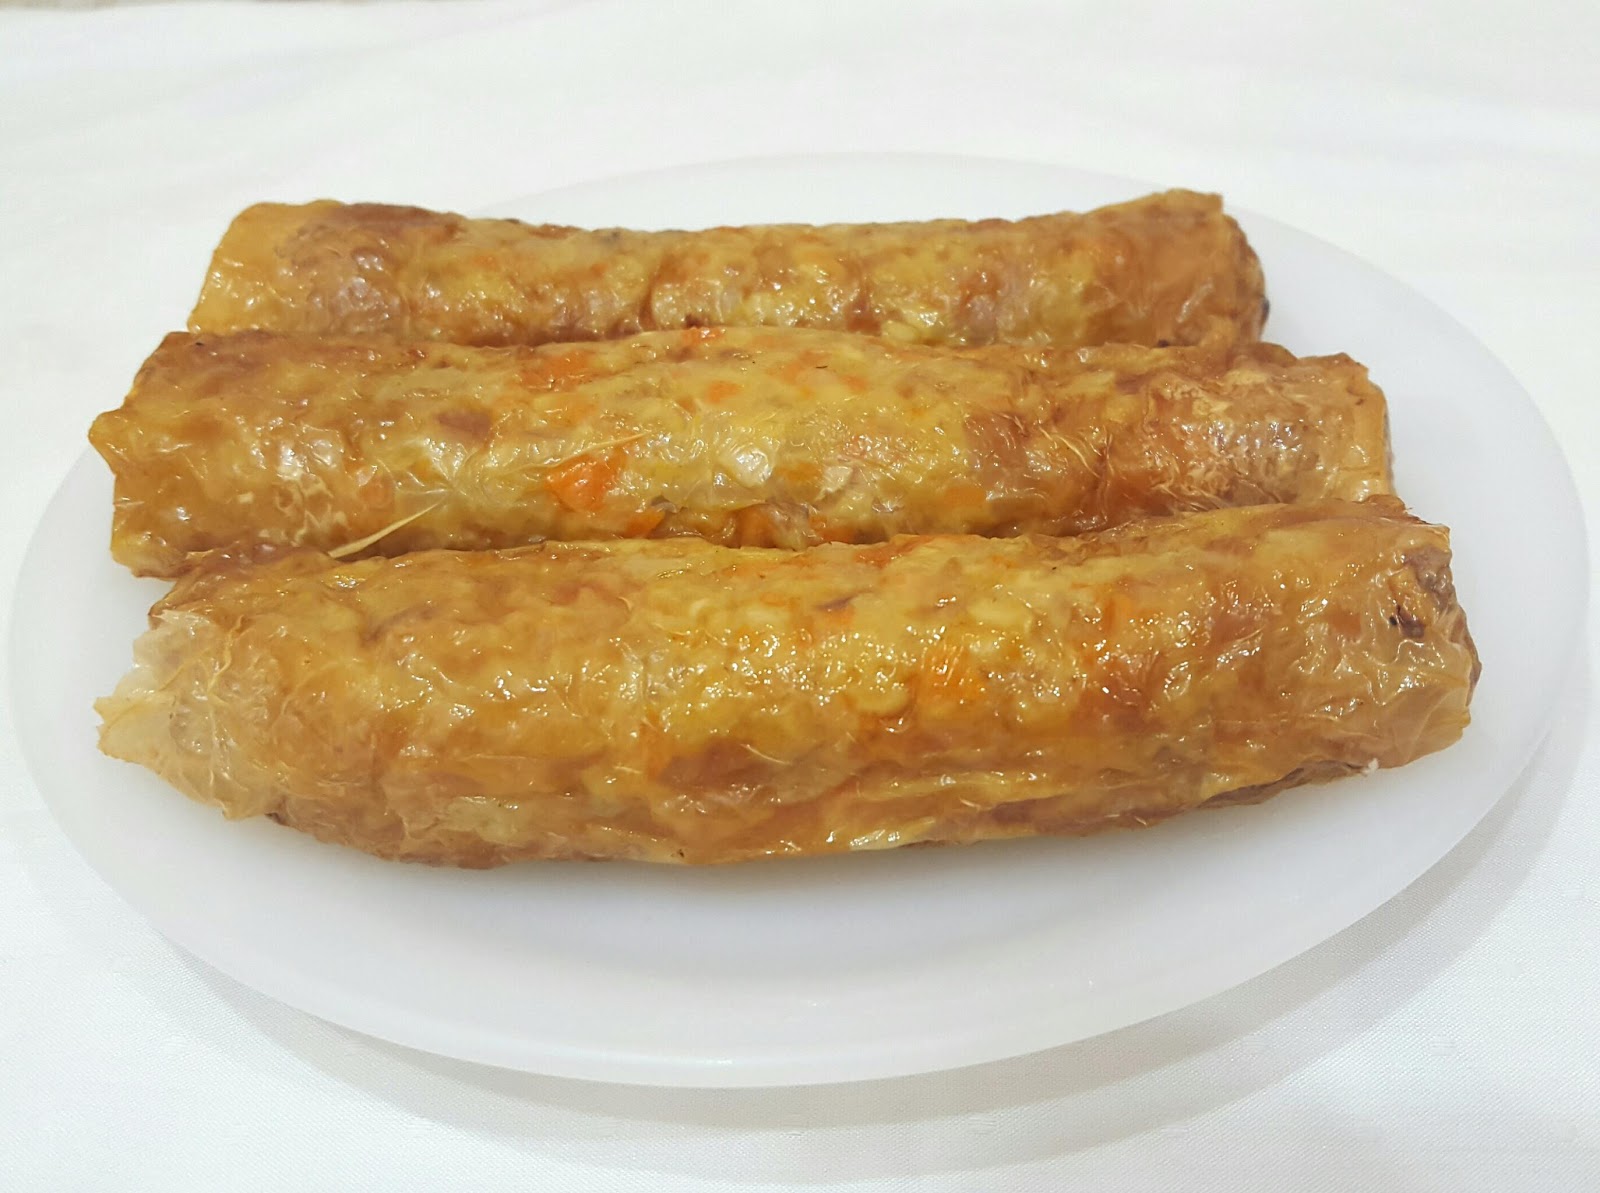
[Recipe] Minced Pork Rolls (Ngoh Hiang/ Loh Bak) Using Airfryer


As you can probably tell from my recipes on The Hedgehog Knows, I am not really a meat-eater (and have a sweet tooth for sure). But something I really enjoy is my mother-in-law's famous homemade Minced Pork Rolls or Ngoh Hiang (五香)/ Loh Bak (卤肉) in Chinese dialect. I love how the crunchy water chestnut bits are juxtaposed against the sweet carrots within the minced pork and held together in bean skin, yielding a taste that is overall juicy and not overwhemingly "meaty".

A bit of history about this dish, it is a uniquely Hokkien/ Teochew dish. Available in many Southeast Asian countries, the dish is often localised so there are many recipe variations around - with/without prawns, with/without eggs, served with dark sweet sauce/chilli sauce etc. Nonetheless, something common would be the 五香 5-spice powder used, and these 5 spices are star anise, cloves, Chinese cinnamon, Sichuan pepper and fennel seeds.

Do note that the amount of 5-spice powder used in this recipe has been cut back as I am not a keen fan of food with strong (spices) taste, so feel free to adjust the amount to your liking. Likewise, if this powder is not available for sale near your home, you can skip that and replace with your favourite seasoning. Who knows, yours may be the next famous version!

Btw, these rolls can be prepared in advance and frozen until required. After thawing and less-than-25 min of quick airfry, they are ready and still taste as fresh! 

Recipe credits go to my mother-in-law. She used to deep-fry these rolls, but now with the airfryer, the oil has been significantly cut back. I am so glad I learnt this from her and can finally share this with you! :)

Minced Pork Rolls (Ngoh Hiang) Using Airfryer

Yield: 7 rolls

Ingredients

(A)
300g minced pork
15 pieces of water chestnut, finely chopped
8 small purple onions, finely chopped
2 carrots, finely chopped
3 tbs light soy sauce
2 tbs flour or corn flour
1/4 tsp five-spice powder
7 sheets of dried bean skin (each sheet 20cm X 15cm)


(B)
1/2 tbs corn flour
100ml water

(C)
A little oil (for brushing before airfrying)


Directions

1. Preheat.
Preheat airfryer at 160 degrees for 5 min.

2. Mix.
In a large bowl, mix all ingredients of (A), except the bean skin, well.

Tips: I usually use my hands (using disposable plastic gloves) as it is faster. Also, mixing in 1 direction is recommended (e.g. Just clockwise or anti-clockwise). 

3. Prepare the "glue".
In another small bowl, mix ingredients of (B) together. This works like "glue" to seal the edges of the bean skin together later.

4. Fill.
Heap 2 spoonfuls of the (A) fillings and lay them flat onto the beanskin.

5. "Glue".
Brush a layer of the (B) mixture along the 4 sides of the bean skin which is not covered by the meat fillings.

6. Seal.
Fold in the left, right and bottom sides.

7. Roll.
Apply a final layer of (B) at the uppermost side. Then, carefully roll the bean skin upwards, ensuring that the meat is held tightly together. (The final layer of "glue" ensures that the meat is held together properly.)

Tips: After folding the bottom layer up, tuck in the skin so that the ingredients remain tight within the roll and it remains a round roll. 

8. Repeat.
Repeat Steps 4 to 7 for the remaining rolls.

9. Airfry.
Apply a thin layer of oil around the whole meat roll. Airfry at 160 degrees for 11 min. 

10. Flip.
Flip the meat rolls and continue to airfry for another 11 min till golden-brown.
 

11. Serve!
Slice each roll up into 4 bit-sized pieces. Serve and enjoy!

  Want to try our other airfryer recipes? Explore here.
 
Show us your food pics if you have tried this recipe too and you may be featured!
Instagram: @TheHedgehogKnows

Lemon Rosemary Chicken Using Airfryer


The family had been commenting about how I keep using the airfryer to bake cakes and cookies, but I seldom use it for the "usual" purpose of cooking meats. One day on my way to work, I came across a really appetizing photo while scrolling through my Facebook:

Are you feeling hungry yet? (Credits: Amy Chai)

After going through the "comments" with the recipe, I thought to myself: the ingredients are healthy, and the lemon and rosemary would give a nice tangy twist to the chicken. Looks and sounds yummy!

I finally managed to try out the recipe myself earlier this week, and I have to say that baking lemon rosemary chicken using the airfryer is one of the fastest dishes I have ever cooked. Serve this with bread/ rice and vegetables and it makes a quick and easy meal! The family especially loved the rosemary aroma, something uniquely different from the way we usually cook our chicken Oriental-style. Below is my slightly-adapted version of the original recipe (with permission from Amy Chai). Enjoy!


Lemon Rosemary Chicken Using Airfryer

Serves 2 persons

Ingredients
(A) For marinating the chicken
350g chicken 
1 tsp ginger, minced 
1 tbsp soy sauce
1/2 tbsp olive oil (else, you can use any other type of oil)

(B) For the sauce
1/2 lemon, cut in wedges with skin 
15g fresh rosemary,  chopped (available at NTUC Finest)
3 tbsp brown sugar
1 tbsp oyster sauce


Directions
1) Marinate ingredients in (A) together for at least 30 min. Chill in refrigerator while marinating.

Prepare the marination ingredients
Pour over the chicken and marinate for 30 min.

2) After 30 min, preheat airfryer 200 degrees for 3 min. 

3) Transfer the chicken (with the marinates) into a baking pan. Bake in airfryer at 200 degrees for 6 min. 


4) Meanwhile, prepare the sauces. Mix ingredients in (B) except the lemon wedges together.


5) Pour ingredients in Step #4 over the half-baked chicken. Spread the lemon wedges evenly in the pan and squeeze. The lemon juice and zest will brighten the flavour of the chicken while tenderizing it.


6) Continue to bake in airfryer at 200 degrees for another 13 min, turning the chicken pieces halfway to ensure that each piece is evenly browned. You are now ready to serve. 

If you are using Philips' baking tray, just remove it and serve. Enjoy!


If you don't have rosemary in your kitchen, feel free to go without!

Update (Jan 2016)
Thank you Alison Bastick for sharing your rosemary lemon chicken. Looks really succulent and yummy!


If you have tried this recipe too, share your photos with us on Facebook!
Instagram: @TheHedgehogKnows


Egg-free Tofu Pork Patties - And They Don't Crumble!

image


After sharing numerous sweet-treat recipes for durian cakes (recipe here) and mooncakes (recipe here), I am happy to share a meat dish at last.  Several readers have also requested for recipes for young children, so this post is just perfect.

Here's an easy recipe, Egg-Free Tofu Pork Patties - And They Don't Crumble!, contributed by Cindy of The HOOting PostThe pork patties comprise meat and vegetables, and is a great 2-in-1 dish that we busy working adults can cook to give our bodies some nutrient boost for the day. I tried out this dish as well and the family simply loved the sweetness of the carrots oozing into the pork patties! 

PS: This recipe is very versatile. The original recipe is for frying, and I have also included the settings for steaming and airfrying too. Enjoy! :)
*************************************************

Tofus are such delicate food that the slightest uncareful interaction with them can cause a messy affair.

Baby V has tried tofu in the usual manners (think: soup) and I’m excited to take up the challenge of using this fragile ingredient and turning it into a mess-free (okay, maybe less messy) dish that’s easy for baby led weaners.
With this experiment, I’m stoked to say that this is great for babies and toddlers with common food intolerances – NO EGG, NO WHEAT, NO NUTS!
Best of all, they don’t crumble! So that means less chaos and clean up. To take the experiment further, we took these patties out with us, so baby V had them out of home. Let’s see how it went!

Tofu Pork Patties
~ makes 6 patties

Ingredients:


  • 1/4 portion of Tofu – rinsed and mashed
  • Fist size of minced pork – washed and drained
  • 5 pieces Baby Carrots – washed and sliced, or cut as preferred. Some prefer to shred or dice, it’s entirely up to you on how “chewable” you like them for your bub. We usually give Vera textures and lumps and never blend her food.. okay, I don’t have a blender but that’s besides the point.
  • 10 leaves of Kale – washed and chopped roughly
Seasoning for meat (optional):


  • Sprinkles of McCormick Italian seasoning
  • 1 tsp light soy sauce
image
Steps:
1. Marinate minced meat with above seasonings, cover bowl with cling wrap and set aside in fridge for 30 minutes. Skip seasonings if you prefer otherwise. Proceed with the latter.
2. In a separate bowl, mix kale, tofu and baby carrots. Drain any liquid and cover bowl with cling wrap and set aside in fridge for 30 minutes.
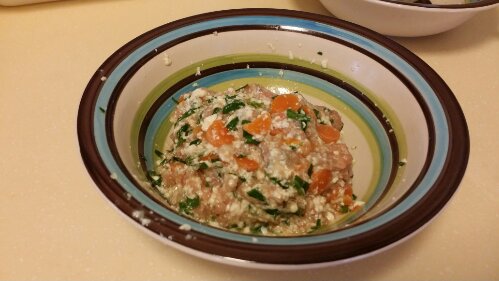
3. 30 minutes later, drain liquids or condensation in bowls. Mix ingredients together and it would look like this (see picture below).
image
4. Heat pan over medium fire. Pour olive oil/butter onto pan. Using a spoon or by hand, shape the mixture into desired shape and size, and place them onto pan.

image
5. Pan fry till golden brown. They should look drier too and it’s normal if some parts get charred. (*Remove charred portions before feeding.) Allow to cool slightly before offering baby.

image
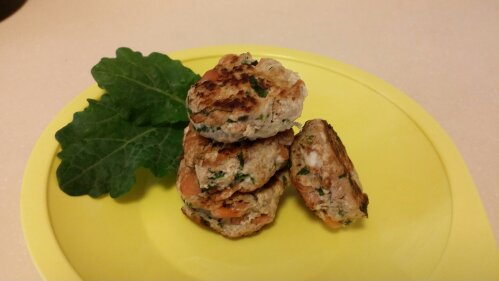
TA-DA!! Here are the Tofu Pork Patties that won’t crumble! I’ve been trying to get hold of kale for a while – they are not available very often – but these superfoods are getting less credit than they deserve.
image
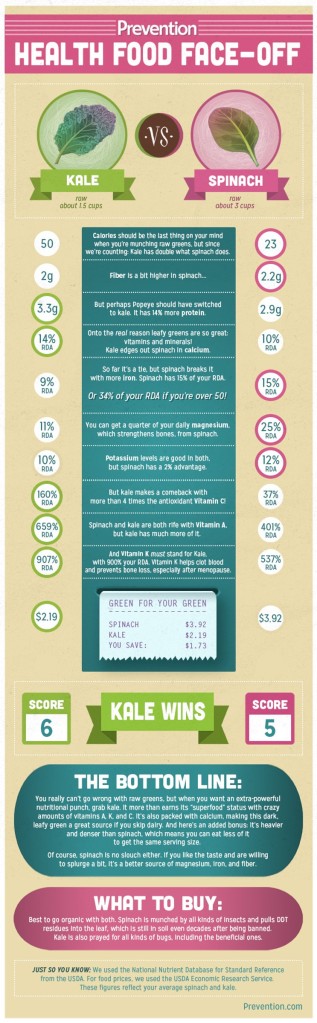
Baby V has been eating plenty of spinach, so now is a time for change! KALE, finally! Source: prevention.com
Baby V has been eating plenty of spinach, so now it's time for a change.
KALE, finally! (Source: prevention.com)

We brought them out in a Zojirushi Thermal Food Jar, well, of course it doesn’t keep it warm (who were we trying to kid?!) since there are only 6 loose pieces dancing in the jar. Baby V gets to eat certain adult meals now that she’s older, so these patties would complement the food options. As she ate the patties, her legs were swinging and she started bouncing in her seat – swell moment for mummy as that meant these had her stamp of approval! WOOHOO!! SUCCESS!!
We were at Food for Thought and hubs was having Banana Pancakes while I had Grilled Salmon. The little one had the best of everything: Pancakes (carbs), Bananas (fruit), Salmon (protein) and of course her Tofu Patties! Her gleeful expression said it all! :D
image
image
Tips:
  • This recipe is highly versatile – you could switch the meats to fish, chicken or beef. The same with the rest of the ingredients but I have a thing for a “balanced” dish, so I’d go for meat and veggie usually, depending on what we can find at the supermarket.
  • For tofu, not exactly necessary to go for the harder types, as we found the one we used worked great for us! Some folks are concerned with the GMO aspect of soy; consider organic options if you prefer.
  • If seasoning is not your thing, consider adding cheese for extra calcium and savoury touch. Both kale and tofu are neutral-tasting.
  • For extra crunch, try adding water chestnut or turnips.
  • For extra texture, coat with breadcrumbs or biscuit crumbs on the outside so they have a crisp “skin” on.
  • Cooking style: This would work great with an Air Fryer too!


************************************************* 

Thank you, Cindy, for sharing this lovely recipe! The original recipe can be found here.


For Steaming

If you would like to steam this dish, after step #3 (see original recipe above), 


  • Steam over medium-high fire for 15 min.
  • Slice open one of the patties to test-check for any pink-ness. If so, you can continue steaming for another 5 min more. Enjoy!!


Before


After


For Airfying

If you would like to airfry this dish, after step #3 (see original recipe above), 


  • Preheat the airfryer at 180 degrees for 3 min.
  • Lightly coat the baking pan with oil.
  • Airfry at 180 degrees for 6 min. 
  • Flip the patties over and continue for another 6 min. Enjoy!!


Before
After
(Mine were a little overcooked at 200 degrees but I just removed the charred bits.

180 degrees would be perfect!) 

If you have tried this recipe too, share your photos with us on Facebook!
Hashtag: #TheHedgehogKnows


Chinese New Year Pork Floss Rolls Using Airfryer


Buying pork floss rolls outside can be as expensive as S$14 for a small bottle. As I now have an air fryer, I wanted to do them myself. If S$6 was going to give me a huge bag of pork floss, I could easily make that into a huge bag of pork floss rolls myself!

Below are the steps using the airfryer. Enjoy!


Pork Floss Rolls Using Airfryer

Ingredients
pork floss (My MIL trusts Lim Chee Guan)
spring roll pastry (I would recommend Spring Home for its good texture)
egg wash (1 egg yolk + 1 tsp of water)
a little oil for brushing

Directions
1. Take the raw spring roll pastry skin out of the freezer. Do not thaw. Cut them into 4 pieces.

2. Put a little pork floss onto the small piece of skin and start rolling. First, fold in the left and right sides. Next, close it by rolling tightly from the base to the top.

3. Seal the sides with egg wash and brush with a thin layer of oil.

4.  Repeat for the rest of the rolls.

5. Preheat the airfryer at 160 degrees for 5 min.

6. Airfry the pork floss rolls at 160 degrees 10 minutes. Every 3 minutes, open and toss them using the back of a spoon so that they get fried evenly.

Tips: You can roll them up beforehand and store in the freezer for up to 2 months. Just make sure that you brush the (raw) rolls with oil before storing in an airtight container, so that they do not stick together. 


It's always great serving your CNY guests with fresh yummy spring pork floss rolls! Nice conversation starters and they make really nice thoughtful little gifts too :)
Bottle: From Daiso (2 for $2)

If you have tried this recipe too, share your photos with us on Facebook!
Instagram: @TheHedgehogKnows